Images Plus Quick Start Guide
A - Choosing Files:
1) (This step optional)
Organize your files - make a directory to put your light frames in and make a
subdirectory of that directory for your dark frames and copy the light frames
and dark frames to these directories.
2) Click the "File" menu and select the "Automatic Image Set Processing" choice.
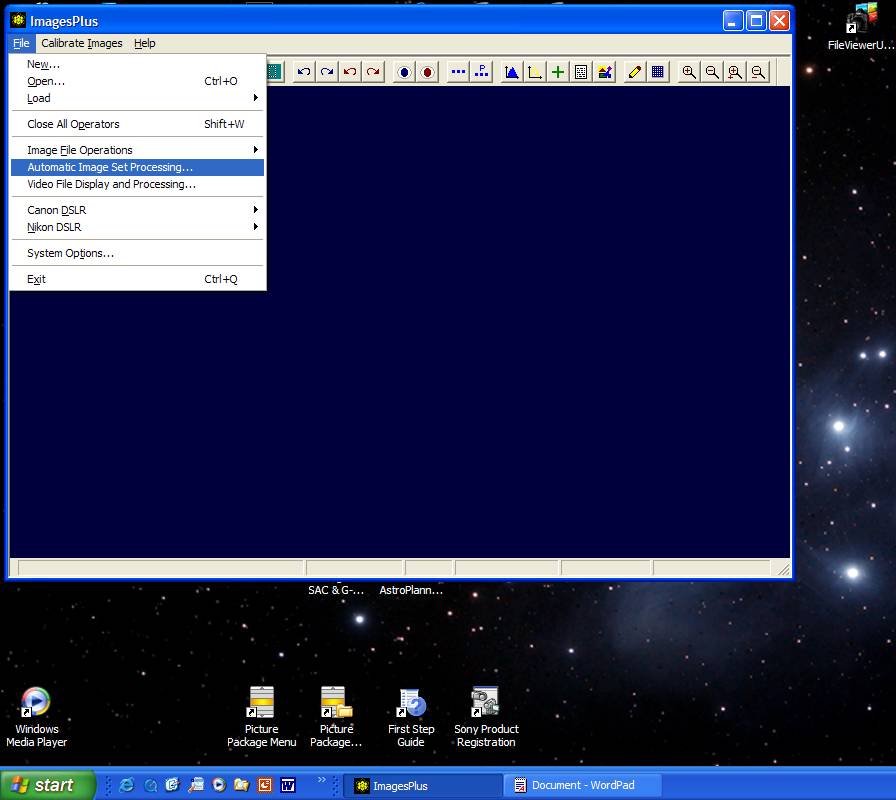
Fig. 1 Images Plus Main Screen
This will display
the "Automatic Image Set Processing" dialog (Fig. 2 below).
Fig. 2 Automatic Image Set Processing Dialog
3) In the "Automatic Image Set Processing" dialog click the "Light Frames" tab, then click the "Select Light Frames" button. This will display a "Select Light Frames" dialog as shown in Figure 3 below.
Fig. 3 Select Light Frames Dialog
4) In the "Select
Light Frames" dialog select your RAW light frames then click the
"Open" button. This will return you to the "Automatic Image Set
Processing" dialog.
5) In the "Automatic Image Set Processing" dialog click the "Dark Frames" tab, then click the "Select Dark Frames" button. This will display a "Select Dark Frames" dialog.
6) In the "Select Dark
Frames" dialog select your RAW dark frames then click the "Open"
button. This will return you to the "Automatic Image Set Processing"
dialog. If you put your dark frames in a subdirectory you will need to click
the pull-down arrow on the "Look in:" combo box at the top of the "Select
Dark Frames" dialog to select the subdirectory that your dark frames are
in before you will be able to select them.
7) In the "Dark
Frames" tab of the "Automatic Image Set Processing" dialog you
can change the directory the master dark frame will be output to and the name
of the master dark frame file but this is not necessary. You may want to make
note of the directory and filename. The default settings for the combine method
(Avg) and the "Delete Converted..." checkbox (checked) are fine.
8) If you have Flat and/or
Bias frames you will click on the appropriate tabs and select those frames. The
Flat and Bias tabs are essentially identical to the the Dark Frames tab and you
will essentially repeat steps 6 & 7 in each of those frames. If you don't
have Flat and/or Bias frames you will skip this step.
9) In the "Automatic
Image Set Processing" dialog click the "Process" tab. In the
"Process" tab click the "Light Frame Processing Parameters"
button. This will display an "Auto Process Parameters" dialog as seen
in Figure 4 below. The default settings should be fine but be sure the "Linear"
check box is checked. Click the "Save" button. This will return you
to the "Automatic Image Set Processing" dialog.
Fig. 4 Auto Process Parameters Dialog
10) In the "Automatic
Image Set Processing" dialog click the "Process" button.
Processing of your subframes will begin and you will see the progress bar
moving as processing proceeds. When automatic processing is finished you will
see the status under the progress bar reading "Calibrate Light Frames -
Completed" and the buttons in the bottom part of the frame will be
enabled.
11) Click the
"Grade" button to determine which files have sufficiently good focus
to use. This will display the "Grade Files" dialog as shown below in Figure 5.
Fig. 5 Grade Files Dialog
12) In the "Grade
Files" dialog you may want to uncheck the "D" and "F"
check boxes in the "Auto Grade" box so frames with poor focus will
not be used in the final result. Once you have unchecked the appropriate grade
boxes click the "Grade" button in the "Auto Grade" frame.
This will begin the grading process.
13) When grading is
finished the status bar will stop and the "Report" button will be
enabled. If you would like to see how the files were graded click the
"Report" button. When finished checking the grades (if you decided to
do so) click the "Done" button in the "Auto Grade Report"
dialog.
B - Aligning Files
14) In the "Grade Files" dialog click the "Align TSR" button. This will display the "Translate, Scale, Rotation Alignment" dialog and a converted, calibrated, and graded frame as seen in Figure 6 below. Look at the file name and after the word "AVERAGE" you will see the percentage score that this particular subframe received during the grading process. If the image being displayed is not the 100% grade image ("AVERAGE1000" in the file name) click the right hand arrow button in the "Select Image" frame. Each time you click the button another image will be displayed and look at the file name until you find the 100% frame. Once you have the 100% frame displayed click the "Reference Image" check box. Once you have checked the "Reference Image" check box, click the "Translate + Rotate" option in the "Alignment Type" frame and make sure the "Correlate" option is checked in the "Alignment Method" frame. Note: after alignment if your image doesn't seem to be aligned well it may turn out better if you try again and pick the "Centroid" method. This will require you to pick a common star and an angle defining star on each frame. Also if the aligned image seems to be reasonably well aligned in some part of the image and not in others this is probably a rotation issue and it may be possible to improve the alignment by choosing the common star in a well alignmed part of the image and choosing the angle defining star in the less well aligned portion.
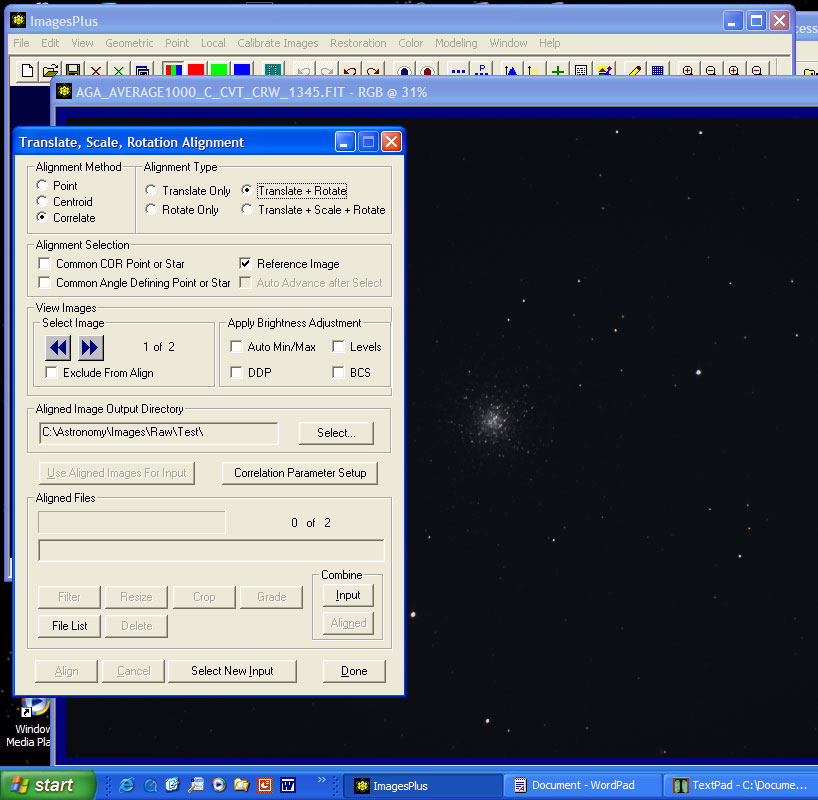
Fig. 6 Translate, Scale, Rotation Alignment Dialog
15) Check the "Common COR Point or Star" check box in the "Alignment Selection" frame then click on the displayed image. When you do the cursor will display as a box with cross hairs. Place the cursor so a well defined star not too close to an other star is close to the center of the crosshairs and hold down the Shift key while clicking which will place a red box around the star as seen in Figure 7 below.
Fig. 7 Selected Common COR Point or Star
16) Click back on the "Translate, Scale, Rotation Alignment" dialog then uncheck the "Common COR Point or Star" checkbox then check the "Common Angle Defining Point or Star" checkbox. Once you have checked the "Common Angle Defining Point or Star" checkbox click on the image again and you will get the box/crosshair just like in the step above. Again click on a star while holding down the Shift key and select another star that is not too near the first one. This time it will put a blue box around the star.
17) Click back on the
"Translate, Scale, Rotation Alignment" dialog then click the
"Align" button near the bottom left of the dialog. This will start
the alignment process and you will see the progress bar moving while the
process is running. It will also show the number of files aligned above the
right hand end of the progress bar. When the alignment process is done it will
tell you how many files were aligned and the maximum number of pixels that
frames had to be translated or rotated.
C - Combining Files:
18) Click the
"Aligned" button in the "Combine" frame to combine the
aligned images. This will display the "Combine Files" dialog (Figure 8
below).
Fig. 8 Combine Files Dialog
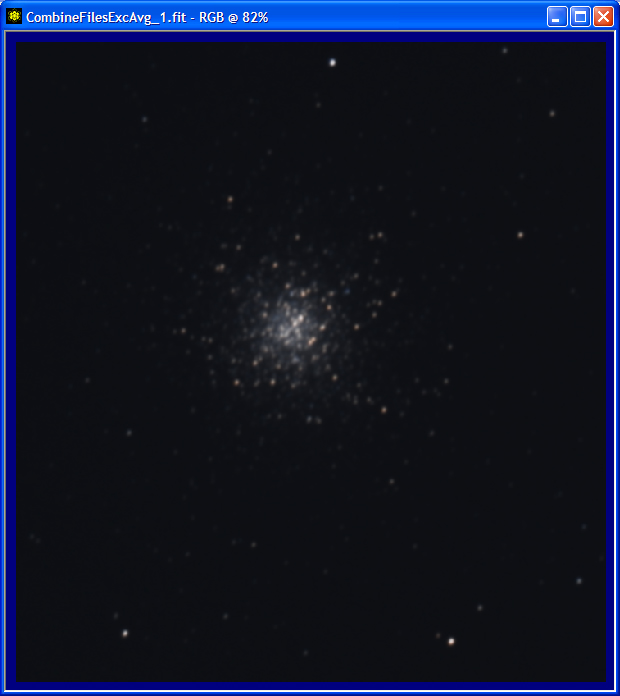
19) In the "Combine Files" dialog click the "Standard Methods" tab (Figure 9 below) then pick a combine method. Generally "Min Max Excluded Average" works well but different methods may work better on different images and some are better at removing aircraft/satellite trails etc. I will not get into what the various methods do here but you can experiment.
Fig. 9 Combine Files Standard Methods Tab
20) Once you have selected
a combine method click the "File Control" tab then click the
"Combine" button. This will start the combining process.
D - Digital Development:
21) When the combine
process is finished click the "Display Combination" button to see the
combined image. A good first step in processing is to do a Digital Development.
You can do this pressing "Ctrl-D" on the keyboard or clicking the
"Color" menu on the Images Plus main screen then choosing
"Brightness Levels and Curves" from the menu, then "Digital
Development" from the flyout menu. This will display the “Digital
Development” dialog as shown in Figure 10 below. NOTE: It is a good idea to save an
unprocessed version of the image before doing anything with it so you always
have that to go back to as you get better at processing or if you do something
"bad" to the image.
Fig. 10 Digital Development Dialog
22) In the "Digital Development" dialog click the "Auto" button and wait for the numbers to change and the hourglass to go away then click the "Apply" button. The following images are M13 before and after Digital Development.
Before DDP:
After DDP:
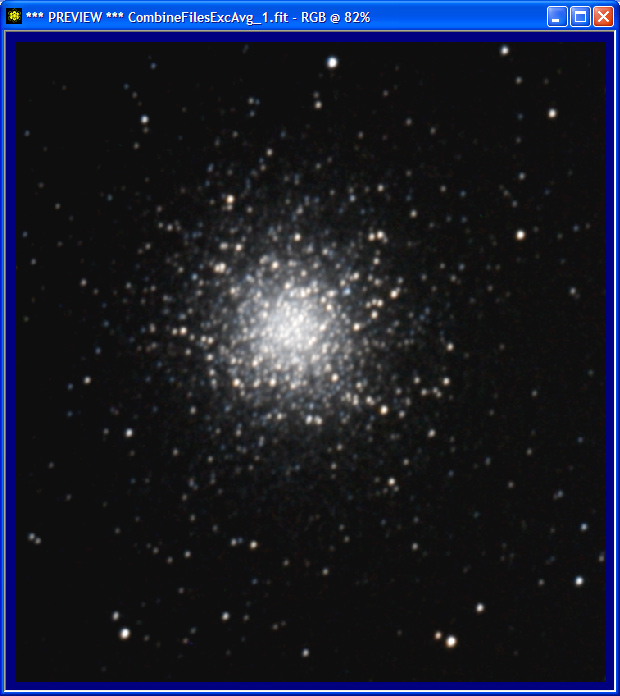
Note that the “before” image is a completely unprocessed RAW after being combined in IP. It has had no processing at all applied to it. The “after” image is completely unprocessed except for Digital Development.
23) Now experiment or save
the processed image. To process in PhotoShop save as a TIFF or JPEG
HINTS:
When you come up with a
good image it is a good idea to do a "Save Copy with History" so you
can always go back and look at the history to see how you did it.
You can use the "Copy
A Portion Of An Image" tool to copy part of an image and see it at a
higher "zoom" and also to experiment with various processing
techniques and if you like something you do to the small portion you can apply
it to the entire image. This can be especially good for some of the iterative
methods and others that take a while to run on a large image